Whether you don’t want to stand out as a beginner in the bouldering gym or you are going bouldering for the first time, you may want to know what to expect and basic do’s and don’ts for a bouldering gym. If this sounds relatable, then here is the perfect bouldering guide for you.
Included below is everything you need to know about what to wear, what gear to bring and how to use it, what the different color handholds mean, warming up, trying challenging routes and even tips for socializing in the climbing culture as well as food and drinks in the climbing gym.
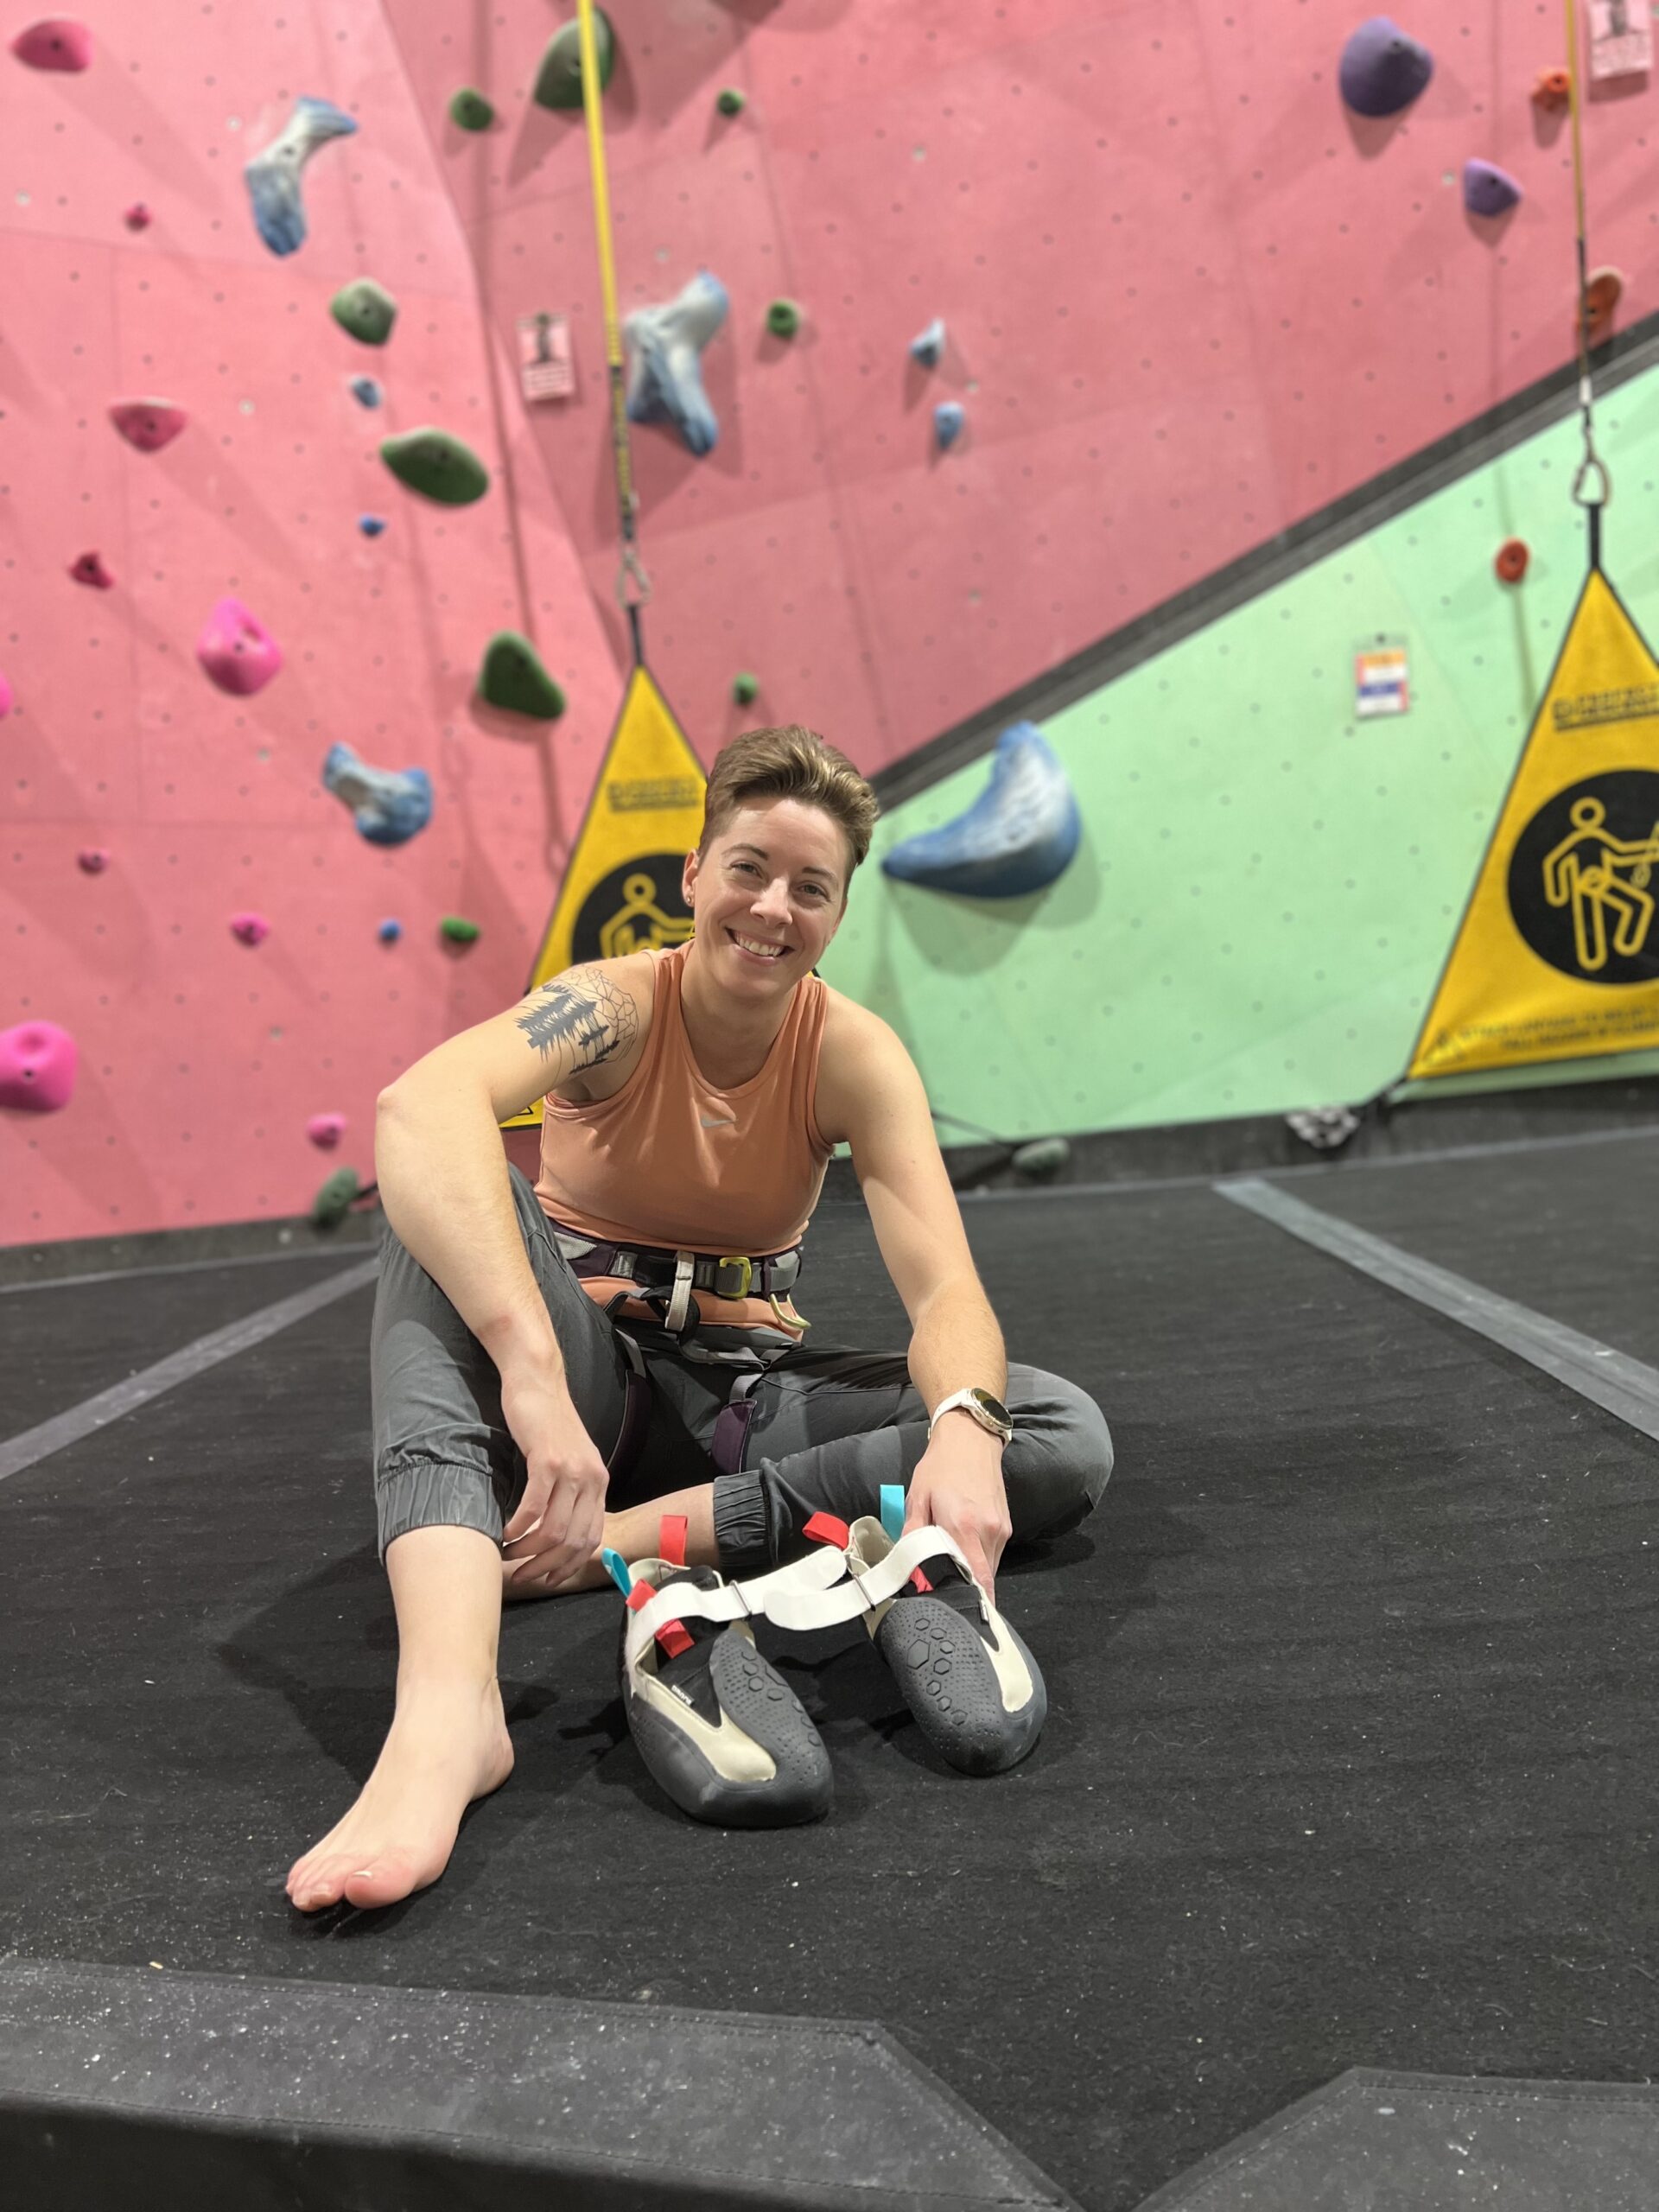
What To Wear Bouldering
One of the most common questions beginner climbers ask before going to the bouldering gym is about what they should wear to go climbing. In general, climbers usually wear clothes that are flexible and has minimal material flapping around. Since you will be contorting your legs and arms in different directions, you want to make sure that your clothing will accommodate. Here is a post about what to wear indoor rope climbing (What To Wear Indoor Rock Climbing)
Do’s
- Do wear leggings. I recommend leggings for women because they are super flexible and form fitting so they will allow you to move your legs any direction or distance as well as not get caught on the wall or under your grip.
- Do wear a tank top. I recommend tank tops for men and women because it doesn’t have sleeves that may restrict your shoulder movement and is form fitted so it won’t get stuck to anything either.
- Do wear hiking pants/shorts or gym shorts. I recommend hiking pants for men because they are usually very flexible and light to wear, but if you don’t have hiking pants, gym shorts should work as well. Most men that wear gym shorts also wear under armour underneath so if the gym shorts ride up while you are working an inclined route, you can keep everything underneath together and hidden.
Don’ts
- Don’t wear long flowy shirts or super flowy pants. The extra material may get in your way or get caught on the rock while climbing so it is a good idea to have something more form-fitted.
- Don’t take your shirt off at the bouldering gym.The gym is environmentally controlled and if you take your shirt off, there won’t be anything preventing you from getting sweat all over the climbing walls. When you are wearing a shirt, most of the sweat from your armpits, chest, stomach or back etc. gets caught on the shirt. In comparison, if you aren’t wearing a shirt, that sweat is more likely to get on the climbing walls. Sweat on the climbing walls is not only unsanitary and smells bad, it also makes it more difficult to climb. While the sweat is wet it makes handholds more slippery and when it drys it leaves a salty/granular residue that can irritate your hands.
- Don’t wear a helmet – bouldering gyms are well padded so you don’t have to worry about hitting your head on a rock
Climbers Chalk
In general, use enough chalk to dry your hands out and protect your hands from getting caught on the rock (cause of skin flappers).
Some climbers feel like there is no such thing as too much chalk and though I use a lot of chalk, however, there is such a thing as too much chalk.
If you use too much chalk, then there will be less friction between your hands and the rock, which defeats the purpose of chalk.
Some climbers don’t even use chalk, so if you don’t want to purchase chalk, or are trying to decide if chalk is meant for you, check out this article (Can you go climbing without chalk?)
Do’s
- Do chalk up your hands before each climb to make sure you have a good amount before getting started.
- Clean the chalk off of handholds after climbing when you are outdoors. In many areas, climbing chalk is considered vandalism if you don’t remove the chalk off of the boulder when you are done climbing so do your part and clean up after your session.
Don’ts
- Don’t carry a chalk-ball around without a chalk bag. Even though most of the chalk is contained in the ball, it will still get chalk everywhere
- Don’t throw your chalk bag. Bouldering is unique in that most climbers don’t wear chalk around their waist and they frequently use chalk buckets. With that being the case, it may be tempting to get chalk out of your bag and then toss it to the side, but not only does this get chalk all over the gym and people might get it on their shoes, it is also a waste and isn’t the cheapest to replace.
- Don’t put chalk on your climbing shoes. You want the rubber on the bottom of your climbing shoes to be as clean as possible so they can have maximum grip on footholds.
- Don’t take other climbers chalk unless they say you can have some. This may seem like an obvious thing but many climbers report that strangers take chalk from their bag while they are on the wall climbing. Chalk cost money and stealing chalk from other climbers is will give you a bad reputation. In addition, you don’t know where their hands have been…
Climbing Brush
Brushes found in many climbers kits are a super helpful tool, especially with indoor bouldering.
Sometimes a climb may be popular and done so frequently that chalk and oil build up on some of the holds.
This makes it really difficult to use those handholds without falling so you can use the climbing brush to remove the chalk or oil as needed.
Do’s
- Do use a brush on handholds that have a lot of chalk on them or are really oily right before you start climbing that route. This will help you grip the rock better and prevent you from getting oil on your hands or from your feet slipping.
- Do use the long extended brushes that are provided at climbing gyms for climbing holds that are too high for you to reach on the ground. If a long extended brush isn’t available, you can climb an easier/adjacent route to get to a climbing hold but make sure you are aware of other climbers and don’t interfere with their training.
Don’ts
- Don’t brush a climbing hold that is below someone climbing. If you are brushing a hold while they are on the climbing wall above you, you are both at risk of injury if the climber falls. In addition, it is common courtesy to wait for them to get off the climb before you scrub a hold.
Climbing Shoes: Rent/Buy
Climbing shoes make a huge difference in climbing. If you are climbing in tennis shoes, you will be limited to the footholds that are big enough for your tennis shoe toe to fit on.
Climbing shoes are made with a narrow space between the toe and end of the shoe so that you can grip small footholds, which are common.
Climbing shoes also have a special rubber on them that are specifically made for gripping handholds and the wall so you can do more climbs with them.
If you want to know what to look for in climbing shoes before you buy them, check out my guide to climbing shoes (Best Climbing Shoes for Bouldering)
Do’s
- Do rent climbing shoes if you don’t already have your own. If you learn that you enjoy climbing, invest in your own pair of climbing shoes
- Do spray your shoes with lysol or some other treatment to keep them from smelling. Here is my post about getting rid of shoe odor (11 CHEAP Ways To Make Your Shoes Smell Better)
Don’ts
- Don’t wear climbing shoes in the bathroom! Whatever gets on your shoes in the bathroom, gets on the climbing wall and then on everyone’s hands that touch that climb so take them off before going in the bathroom.
- Don’t wear climbing shoes when you aren’t climbing. The rubber on the climbing shoes is very important to keep in good condition and wearing them to and from your car can wear them out so they won’t last as long. Use tennis shoes or approach shoes to hike to the boulder, not your fancy climbing shoes.
- Don’t wear socks with your climbing shoes. There are climbers who wear socks while climbing, however, many suggest that socks can create a slippery inside of your shoe and make it difficult to grip the footholds at different angles. Here is a post that gives you the pros and cons of wearing socks with climbing shoes (Do you wear socks with rock climbing shoes?)
Different Color Handholds and Tape For Indoor Bouldering
While each climbing gym is different, there is one thing that remains constant – colors outline the route/problem set.
There are two types of climbing gyms, one that has handholds all the same color for each route and one that has colored tape that outlines what handholds are used for the route. The purpose of this is so that climbers know what handholds/footholds to use to get up the route.
In addition, the number of tape pieces on a climbing hold tells you how many limbs are supposed to be applied to that climbing hold to start the climb. For example, in competition routes, there may be four different pieces of tape that represent each limb (your feet and hands).
Do’s
- Do use whatever handhold you want as long as they are all from the same route/color. This is how climbs are meant to be climbed and getting creative with getting up the wall by using many different handholds is a great practice.
- Do start the climb on the hand holds that have tape under them or some sort of indication of the starting position. Most routes/problems start with two hands on one hold. Some routes start with two seperate handholds, which are indicated with tape or a sticker on two handholds of the same color. If your climbing gym doesn’t have tape or stickers suggesting where to start, you can usually guess where the problem starts by looking for a handhold closer to the ground, has enough space for both hands and has a lot of chalk on it.
- Do climb all the way to the top or to the finish point in a climb and place both hands on the climbing hold. Both hands on the final climbing hold or the top of the wall is the proper way to finish a climb. In addition, the proper finish is part of the challenge so without doing the proper finish and figuring out how to get the correct balance for it, the challenge is incomplete.
Don’ts
- Don’t use handholds from different colors. When you climb your first couple of routes, it is ok to use different colors to get to the top if you absolutely have to so you can get the hang of what climbing feels like. However, using different colors to get to the top misses an essential part of the challenge in climbing. Using other colors may also cause you to accidentally interfere with other climbers by using their handholds.
- Don’t start a climb that overlaps or questionably overlaps with someone that is currently climbing on the wall. Wait until they get down before starting and take turns, if needed.
Warming Up
Warming up is an important aspect of bouldering if you want to keep climbing without getting pumped.
Pumped is when your muscles aren’t able to keep contracting. For example, beginner climbers frequently get pumped in their forearms and aren’t able to keep climbing.
Warming up also decreases your chance of injury, which is obviously another important part of keeping you safe.
Do’s
- Do warm-up your muscles with cardio such as mountain crawls or jumping rope. This is an important process for preparing your body for the amount of work you are going to put into it. In addition, warming up and getting the blood flowing to every part of your body will make it so that you can climb harder and better with a lower risk of injury.
- Do dynamic stretching before you start climbing. This is a good idea after you have gotten your blood pumping and it will make it so that your muscles can extend fully while you climb.
Don’ts
- Don’t warm up on the hangboard. In general, unless you have been climbing for a couple of years, you shouldn’t be on the hangboard at all because it can lead to injury. If you are experienced enough to start hangboarding, then make sure you are fully warmed up before exercising on the hangboard. Some activities require you to be thoroughly warmed up before doing them and the hangboard is one of them.
- Don’t do static stretching before your climbing session. I recommend static stretching after your climbing session because it is an important injury prevention tactic, but not before your climbing session. I’ve seen many climbers start their climbing session with static stretching, but static stretching is only good for warm muscles and you can actually cause more damage from static stretching cold muscles than not stretching at all before your climbing session.
Beta
When climbers are trying different moves or trying to figure out what moves to do next, they are figuring out the beta. Beta is the moves that a climber needs to do to get through the climbing problem/route. Sometimes, climbers share beta with their fellow climbers if they have done the climb before, or recognize what the climber needs to do.
Do’s
- Do share beta if a climber asks for it. If you have done the climb before, you can suggest beta based on what you have experienced.
- Do watch other climbers and learn from the way they climb. Sometimes the moves that you need to take to complete the climb aren’t clear and watching other people climb the route and reviewing their beta will make it easier for you to complete the climb.
- Do encourage climbers to keep going and cheer them on (without providing beta).
Don’ts
- Don’t “spew beta” without first establishing that the climber you are talking to wants it. Just because a climber is struggling, doesn’t mean they were asking for beta. In general, if you have a good relationship with the climber, then you can provide beta, otherwise, it isn’t usually welcome. A big reason for this is because your strengths and what you would do to climb a route is going to be different from anyone else’s strengths and abilities. Also, part of the fun in climbing is figuring out your own beta.
- Don’t hassle climbers into following your beta. As mentioned above, everyone has different strengths and capabilities that may not match yours so it is important to recognize that and let them do it their own way.
Challenging Bouldering Routes
The nice thing about a bouldering gym is that there are plenty of routes/problems in close proximity.
This gives you the opportunity/exposure to climbs of all grades and challenges so you can try easier climbs as well as challenging bouldering problems.
Some climbers avoid challenging bouldering routes because they fear falling or embarrassment if they can’t complete the route/problem.
In regards to fear of falling, you can ensure safety by making sure that you have a spotter (outdoor bouldering only) or appropriate pads. For indoor bouldering, the pads are usually more than adequate.
As for embarrassment, talk to the people you are bouldering with about your concerns and they are more than likely going to express that they care more about you trying than how good you are climbing.
In addition, other climbers are usually focused on their own climbing experience and are less concerned with whether or not you can complete the climb so embarrassment would likely only be self-inflicted.
With that being said, it is important that you try challenging bouldering routes so that you can be exposed to the different types of movements and identify what you can work on to improve your performance. You never know what you are naturally good at or enjoy the most unless you try.
Do’s
- Do try difficult climbs. By trying climbs that you aren’t confident you’ll finish or that are labeled above your current climbing grade, you will improve faster and it will help you see your progression more clearly. For example, by attempting to climb a route that is above your climbing grade, you will be able to recognize what skills/strengths/techniques that you struggle with and what you need to work on. As you continue to climb and get better, you can go back to that route to see if you have gotten better. Eventually you will be able to complete the route without a problem and it will be clear how much you have progressed. If you only climb grades you know you can do or that are within your current range, it will be difficult to advance grades/levels. Challenging yourself is one of the easiest ways to identify what you need to work on and motivate you to get better, which in turn, makes it easier to advance your climbing grades.
- Do focus on balance and technique to get through difficult climbs. Even if you aren’t the strongest climber, most climbs can be achieved with minimal muscle and advanced technique and balance. Balance can take a lot of strength, however, so keep that in mind if you are choosing between technique and strength training.
Don’ts
- Don’t muscle through every route. The problem with relying on your muscles to push and pull your way up the climbing route/problem is that you will run into the problem of not being strong enough to finish difficult climbs. The only solution for someone that relies on strength to finish a climb and progress is by strength training and weight training. Strength training can be difficult and time consuming, not to mention how long it takes to see results. In comparison, focusing on technique takes less time to learn and is immediately applicable for the climbs you are working on. This makes a balance between technique and strength the optimal focus for improving your performance and climbing harder routes.
- Don’t hog the wall. Even though I recommend trying difficult climbs, that doesn’t mean you should spend your entire climbing session on that wall. If you fall off after the first move it is ok to hop back on, but if you fall more than once, make sure you look around to see if other climbers are waiting for you. Be courteous to other climbers and take turns on different sections of the wall as needed.
Spotting
Spotting is used to assist climbers who are bouldering if they fall. Usually spotters are below the climber (not directly) and have their arms out to help guide climbers if they fall. The two main tasks for a spotter is making sure the climber lands on a mat and to direct the climbers body positioning so that they land on their feet instead of their head. Most climbing gyms have ample amount of mats to decrease the risk of falling outside of the mat zone. In addition, some gyms have policies against spotting so make sure you understand the gym’s policies before spotting. With that being the case, spotting is usually only done in outdoor bouldering and not at an indoor bouldering gym.
Do’s
- Do spot climbers if mats don’t properly cover the fall zone where you are climbing. This is a rare occurrence in climbing gyms since most countries have laws and guidelines that require indoor climbing gyms to have specific space around the climbing walls to be covered with mats. However, if you are at a gym that is outdated or bouldering outdoors where mats don’t properly cover the fall zone for specific problems, then it is appropriate to spot a climber.
- Do communicate with the climber about how they would like to be spotted if they ask you to spot them. Some climbers may just want a hand on their back so that they feel safer while they climb an inverted problem.
Don’ts
- Don’t spot a climber unless they ask you to. If you are spotting a climber and they are unaware that you are spotting them, then the risk of injury to you and the climber increases. For example, if you are in their fall zone and the climber doesn’t know you are there, they may swing their arms in an attempt to change their body position and end up punching you in the face. However, if a climber asks you to spot them, then it is appropriate for you to assist them.
Socializing
Bouldering is a very social sport. Compared to basketball, soccer, Boxing, etc. there isn’t the same kind of rivalry that makes people avoid talking to each other and there is a lot of rest time in between climbs so you have many opportunities to have conversations with other climbers. This is one of the things that makes climbing (especially indoor bouldering) so fulfilling to many people. In addition to a great workout and a mental break from the rest of life, you also get to meet and talk to. like-minded people at the climbing gym.
Do’s
- Do introduce yourself to other climbers. Yes other climbers are working on their own problems/routes, but most climbers appreciate having conversations with other climbers. You can talk about different climbing problems they are working on or ask for beta on different climbs to get the conversation started and then you can decide if you want to continue getting to know them.
- Do compliment people on their send. “Send” or “send it” is a term used for when a climber completes the problem/route. Many climbers work on routes for a long time before they are able to send it (also known as projecting). You can amplify their feeling of achievement by cheering them on and complimenting them on the send. This is a great way to start a conversation and will also make them more comfortable talking to you if you ask about beta or training recommendations.
- Do encourage other climbers that are on the wall. One of my favorite things about climbing gyms is the random people that will be walking by the problem you are working on and cheer you on to keep going. I’ve had multiple friends, myself included, feel that external source of motivation gave them the burst of energy they needed to finish the climb. In addition, it makes climbers feel more comfortable around you and more likely to approach you with a conversation.
Don’ts
- Don’t make fun of or pretend like you are better than other climbers. The culture that climbing has created is one that looks down on people who make fun of or pretend that they are better than other climbers. Being humble is something that the climbing community honors more than any other sport community (as far as I’m aware). Even if you are better at climbing than they are, discouraging climbers by making fun of them or acting like you are better than them will likely lead to everyone in the gym to hating you.
- Don’t approach climbers that have headphones in. Though this isn’t always the case, headphones are a common sign that they are there to work, not socialize. This is also applicable if you don’t want people to approach you – put headphones in.
Food and Drinks
Climbing is an active sport so having something to keep you hydrated and energized can be helpful while you are climbing. However, there are certain things that you may not be aware of if you haven’t been bouldering for very long.
Do’s
- Do bring a bottle of water to the gym. Staying hydrated is very important in climbing. Most climbing gyms have drinking fountains but if you don’t want to walk around in your climbing shoes or you don’t want to take your shoes on and off for a drink of water, then a bottle of water will be perfect. In addition, bringing a water bottle with you will increase the likelihood of continued water intake.
- Do bring a power bar/granola bars. Climbing can be draining if you don’t have the proper nutrients in your system. A power bar/protein bar/granola bar is a great snack that can provide that nutrients and it is relatively portable and mess-free to eat.
- Do eat over a trash can if you’re a slob. Bringing simple food is usually allowed in climbing gyms, but if you think whatever you are going to eat will be messy, eat it over a trash can. The trash can will catch any mess you may make and it also confines you to space away from other climbers so you don’t get food on them, the gear or mats. As for eating outdoors, just be considerate of nature and wildlife. Try to keep everything as clean as possible.
Don’ts
- Don’t bring crummy food. Crumbs in a climbing gym is one of the worst things you can get stuck to the bottom of your feet or your climbing shoes. If it is crummy, leave it at home or eat it in the car.
- Don’t put bottles of water on the mats. Though I encourage you to bring water bottles to the gym, don’t put the bottles on the mat. I didn’t know this when I first started climbing, but I have learned since that if any water gets on the mats, it can be a slippery mess and someone could get hurt. Instead, place the water bottles on the concrete floor (if there is one) or in a cubby while you are climbing (again, if there is one).
- Don’t eat while on the mats. Just like getting crumbs on the floor, anything that gets on the mats can transfer to someone’s feet and then transfer to the wall and then transfer to every climbers hands… This can be especially concerning if it is peanut butter and someone has a deadly allergy to peanuts.
What Have You Noticed?
Bouldering can be a very rewarding sport when you get into it but starting out as a beginner climber may be intimidating.
Knowing what to expect and some basic do’s and don’ts will help you be more comfortable when you go to the bouldering gym for the first time.
If you have been to the bouldering a few times and think there should be some additional items added to this list, please comment below – I will keep this list as up-to-date as possible with everything a beginner should know before going bouldering for the first time.
More About Bouldering:
- What Is The Minimal Gear Needed For Bouldering?
- Can You Boulder Alone? The 8 Benefits Of Climbing Alone
- The Complete Guide For Bouldering Grades – What You Should Know
- Should You Wear A Helmet For Bouldering?
- Can You Boulder In The Rain Or When The Rock Is Wet?
- First Time At The Bouldering Gym – What You Should Know
- Pros And Cons Of Indoor Bouldering
- Indoor Bouldering: Do’s And Don’ts For Beginners
- Bouldering For Beginners: What You Need To Know
- A Guide For Climbers: Bouldering Drills 101
- Is Climbing and Bouldering Good For Cardio?