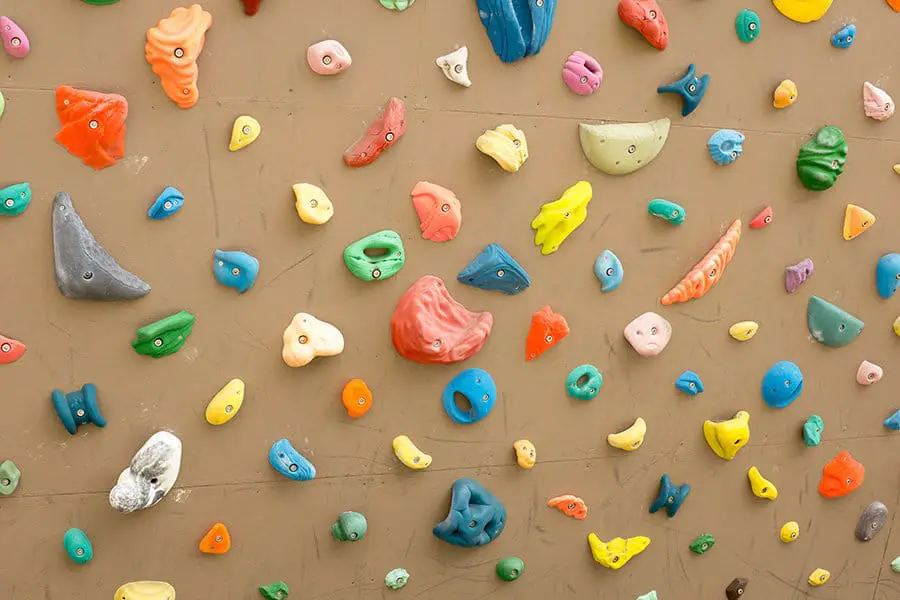
The way you move through a climb is dependent on the type of holds that you have available. If you have a side-pull or an undercling, you need to make moves that will position yourself in a strong position to leverage those climbs. Because of this, it’s important to understand the main types of handholds you will use climbing.
Below is 14 of the most common climbing holds that you’ll see indoors and outdoors as well as the ideal technique for using them.
1. Jug Climbing Holds
Jug holds, also known as bucket holds are big open hand holds that you can get your whole hand on and sometimes two hands on. Most climbers love this kind of grip because it is easy to use and can provide a place to rest.
Rock Climbing Grip Technique for Jug Holds
Jugs are the easiest holds to use and there is very little technique used with jugs. Using four fingers, grip onto the jug hold at the part of the hold that is sticking out. If the part is sticking up, then put the weight below. If the part of the hold that is sticking out is sticking to the side, then put the weight to the opposite side of where it is sticking out. Whatever direction the part of the hold is sticking out, place your weight to the opposite side and pull on the hold with your hand toward your body.
2. Incuts/Mini Jugs Climbing Holds
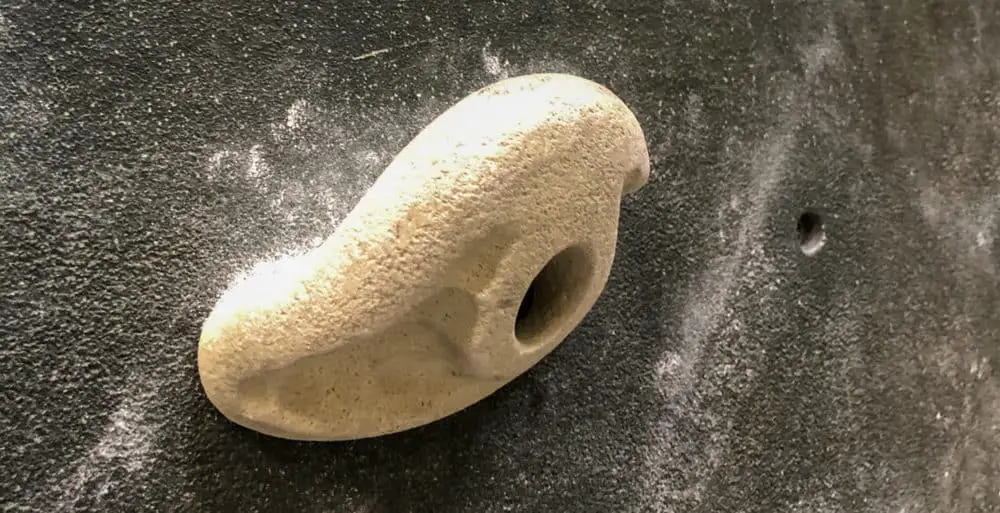
This type of climbing hold is just like a regular jug but it is smaller and is probably the most common type of climbing hold. Usually, you can only fit two or three fingers, compared to two hands or the full hand that fits on jugs and it may be shallower so it is harder to climb than the jug. As you get better at climbing, these become easier to use and also become great places to rest.
Rock Climbing Grip Technique for Incuts/Mini Jug Holds
You can climb incuts/mini jugs very similar to jugs so use as many fingers as you can to grip the jug and pull toward your body while on it. Try to climb with your arms straight when you reach an incuts/mini-jug to reduce fatigue and engage the least amount of energy.
3. Edge Climbing Holds
Edge/Ledge Holds are just like they sound, they are the edge of a rock and can be small enough for just a couple fingers to fit on, or big enough for both hands to use.
Divide your hand into five parts, the finger tip, the middle finger (area between the two joints at the end of your fingers), the bottom of your finger (what touches your palm), your palm and your thumb. An edge is where you can fit at least two parts of your hand on the hold. Frequently you can place all of your fingers on a hold and in some rare cases, everything but your thumb on the hold.
Rock Climbing Grip Technique for Edge/Ledge Holds
Edge climbing holds can be easy or difficult to use, depending on the size and angle of the hold compared to the direction of the problem. Essentially, put as many fingers on the hold as you can and put your weight in the opposite direction of the angle of the hold so that you are pulling down on the hold.
4. Side Pulls Climbing Holds
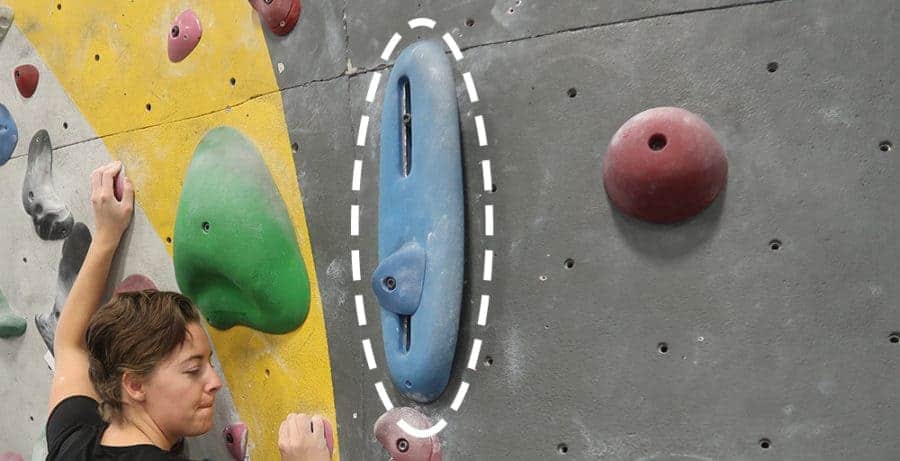
Side pull climbing holds are similar to edge climbing holds that are angled toward the side. This makes it so that the angle of your thumb points away from your body compared to your thumb pointing up. You should still be able to place at least two parts of your hand on the climbing hold, so look for the angle that would allow you to do that.
Rock Climbing Grip Technique for Climbing Side Pull Holds
Just like edge climbing holds, side pulls can be easy or difficult to use, depending on the size and angle of the hold. Ideally, you put as much of your hand on the hold as you can while putting your weight in the opposite direction so that you are pulling on the hold toward your body. Many climbing routes/problems will have a side pull climbing hold for both hands at the same time so before starting the climb, identify which hand you will pull with first and then balance yourself with the other pull climbing hold.
5. Crimp Climbing Holds
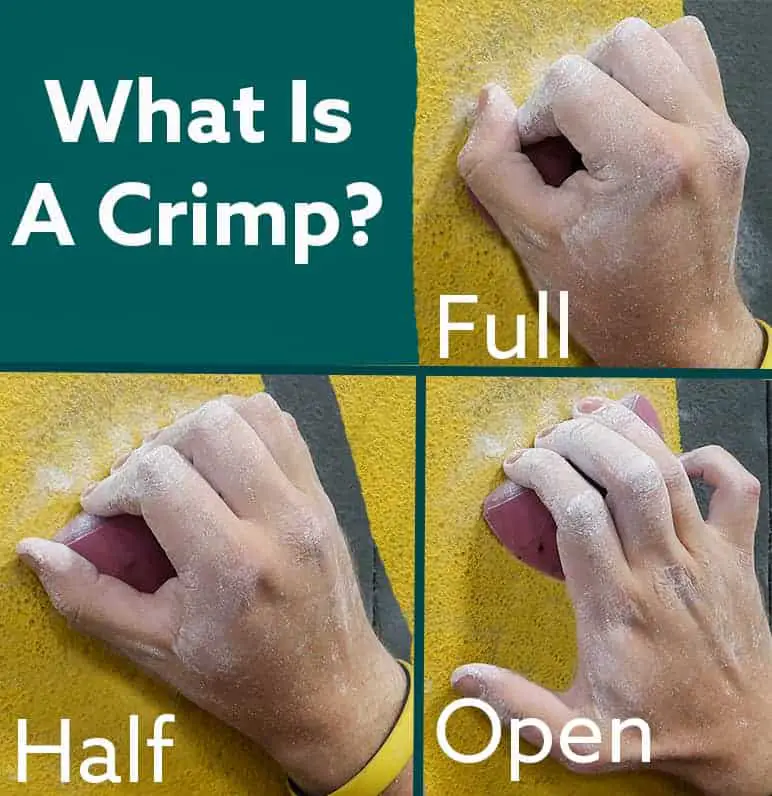
Crimp Holds are small edges that are only big enough for the tips/pads of your fingers. Depending on the angle of the hold, you may need to move your body weight to the side for better friction between your fingers and the hold so that you are at an angle you can pull with. This climbing hold is the most dangerous climbing hold because you are at a higher risk of injury from tendon strains in your hand, wrist and arm. Here is an article all about crimp climbing holds.
Rock Climbing Grip Technique for Crimp Holds
There are three crimp climbing holds techniques, full, half and open crimp. Since open crimps are the safest, that is the technique we suggest. The most important thing is to place as much weight in your feet as possible and strive to only use your hand for balance, if possible. Place your finger tips on the hold and place your weight to the opposite side so that you can pull on the hold.
6. Pinch Climbing Holds
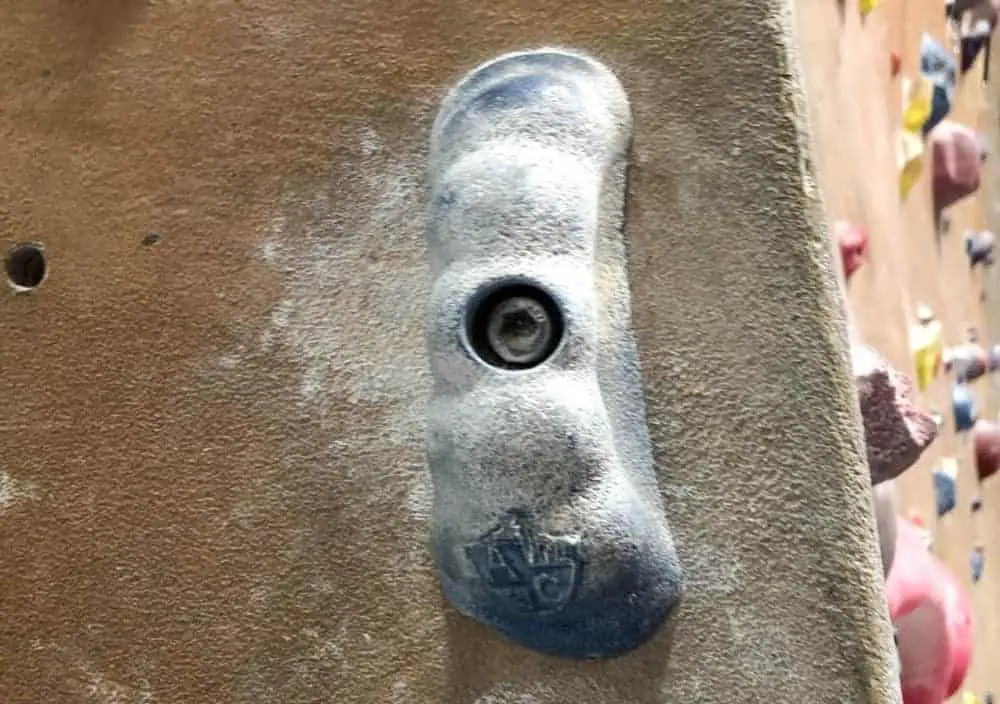
Pinch Holds are exactly like they sound, they are a hold that you can pinch with your thumb on one side and your fingers on the other. Some people really enjoy pinches because it uses your thumb, which has a lot of power.
Rock Climbing Grip Technique for Pinch Holds
The technique for pinch grip hold is exactly as it sounds, you pinch it. With your fingers on one side of the hold pinch the hold with your thumb on the other side of the hold. The easiest way to use a pinch hold is to place your weight to the side of the hold that has four fingers instead of in front of the hold. This will help prevent you from exerting more energy than required.
7. Pocket Climbing Holds
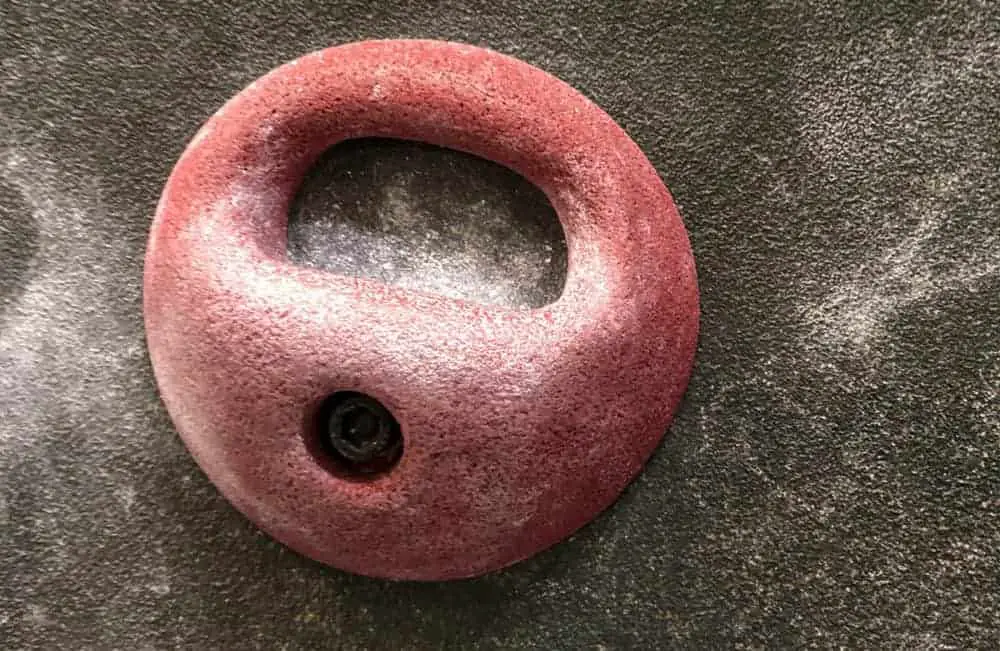
Pocket Holds are holes in the rock that are usually only big enough for one finger but sometimes they can be big enough for three fingers depending on how big your hands are. Most people try to fit the middle and ring finger in the hole because they are the strongest together.
Rock Climbing Grip Technique for Pocket Holds
The technique for pocket holds is mostly related to what fingers you place in the hold and pull downward on. For the fingers that don’t fit in the pocket, rest them flat against the wall/rest of the hold. If you have enough space in the hold for three fingers, place your pointer finger, middle finger and ring finger. If you have enough space for only two fingers, the strongest and safest finger combination is your middle finger and ring finger. Some people use the pointer and middle finger to get better angles, but this will strain your tendons more and isn’t recommended.
Once you place your fingers, shift your weight to the angle that allows you to pull on the climbing hold. Some pocket holds allow you to pull from every direction, including from above similar to an undercling climbing hold so keep that in mind when you are looking for beta (beta is a move-by-move plan for the climbing route).
8. Monos Climbing Holds
Monos climbing holds are just like pocket holds but it’s only big enough for one finger. Because there is only room for one finger, it requires a lot of energy and strength in the finger you are using and forearms. It has a high risk for straining tendons and it is only found in more advanced climbs. While using monos, listen to how your body feels so that you don’t strain your finger causing an injury.
Rock Climbing Grip Technique for Monos Holds
The technique for climbing monos holds is similar to pocket holds. Place your finger in the hold with the rest of your fingers resting flat against the wall around the hold. Most people use their pointer finger if the location of the hold is to the side of the climb. Ideally you use your middle finger because it is the strongest finger and has the most connections to the rest of your hand muscles. Once you place your finger on the hold, move your weight to be in pulling position and pull your hand in the mono hold toward your body.
9. Slopers Climbing Holds
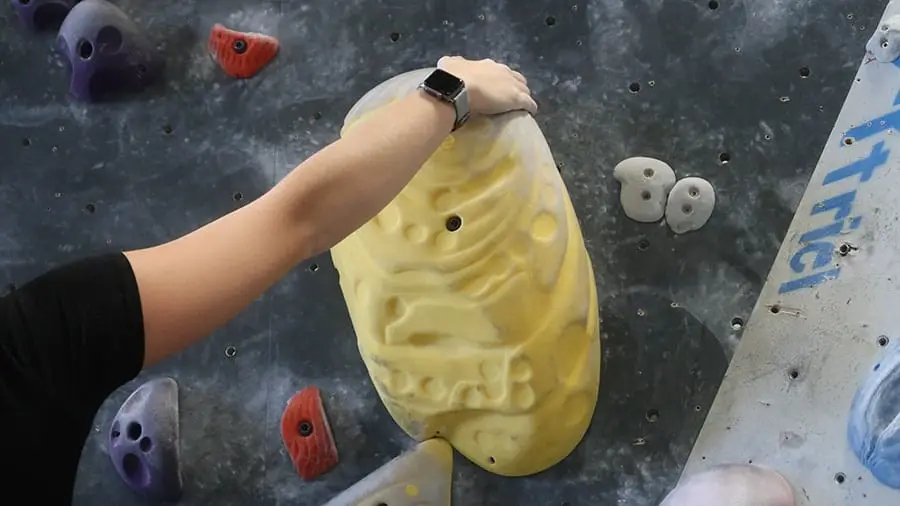
Sloper holds are large rounded “holds” (if you can call it a hold), that slopes away from the wall without an edge that clearly indicates where to hold. These holds are usually more difficult to use and are only seen in more challenging or advanced climbs. Some slopers are easy to identify where to the hold, but they are still called slopers because they are so big and your fingers don’t wrap around anything. Here is an article all about sloper holds.
Rock Climbing Grip Technique for Slopers Holds
Using a sloper climbing hold can be one of the more difficult techniques in rock climbing. Unfortunately, slopers are made in a way that is so different from each other that one solution doesn’t fit all. Most of the time, you can find where there is an indent in the hand hold or, if your lucky, where the chalk accumulated and place your entire hand on the hold in that location. Because these holds are so difficult to use, it is usually helpful to brush the hold clean and then put a lot of chalk all over your fingers and palm. If you anticipate using your forearm on the hold, make sure that you chalk your forearm as well so it doesn’t get irritating.
10. Undercling Climbing Holds
Undercling holds are any hold that you grip from underneath. Undercling climbing holds can be found anywhere on the climbing route and depending on the footholds, it can be a great place to rest. They can also range in size for your grip and can be big enough for a couple of fingers up to being big enough as a kneebar. Here is an article all about undercling climbing holds.
Rock Climbing Grip Technique for Undercling Holds
The technique for undercling climbing holds is relatively simple; get above the hold. If you are below the hold, treat it more like a pinch that is angled down and work to put your feet a couple of feet below the hold and pull up on the climbing hold so that your weight is level with the undercling handhold or above the handhold. Once your weight is level with or higher than the hold, you can place as many fingers under the hold that you can fit and pull upward (similar to a deadlift or kettlebell swing movement). Once you are standing up with your hands pulling up on the hold, you can leverage it to get much higher on the climb.
11. Flake Climbing Holds
Flake Holds is a piece of rock that is detached from the wall and creates a crack between the hold and the bigger rock. Some climbers use it like a crack and jam their arms into it, but it can also be used as a large jug hold or edge hold. Depending on the size of the flake, you can place a couple of fingers on it, up to both hands.
Rock Climbing Grip Technique for Flake Holds
The technique for flake holds is a combination of jug and edge holds. To grip a flake, you will place as many fingers on the hold as possible. If the hold is sticking up, then put the weight below. If the part of the hold that is sticking out is to the side, then put the weight to the opposite side of where it is sticking out. A lot of times, flakes can be really long and you can use it to move large distances sideways or up depending on which direction the flake is facing.
If the hold is sticking up, you can move sideways easily by smearing your feet. To do this, place your feet a couple of feet below the hold so that the soles of your feet are facing the wall and your toes are gripping the wall (this way you don’t need any footholds). Move your hands across the hold, one hand at a time and then adjust your feet as necessary.
12. Horn Climbing Holds
Horn Holds are similar to jug holds, but instead of placing your palm toward the hold, you usually place your hand to the side of the hold. Most horns have a larger base and get more narrow near the tip, so depending on your situation, you can choose what part of the horn you hold onto.
Rock Climbing Grip Technique for Horn Holds
Horn holds look similar to jug holds but they are bigger and instead of putting your hands at the end of the hold, it is usually better to hold it on the side with your palms facing inward toward your body. Most horn holds are larger at the base that is closest to the wall and skinnier toward the end so identify where on the hold is easiest to grip. Place your weight/center of gravity below the hold and slightly to the side so that your elbows are outside of your shoulder width area. These holds are usually great holds to pull yourself up on but better technique would be to move your feet and place as much weight on your legs as possible as you move up to the next hold.
13. Climbing Volume Holds
Climbing volumes are a piece of the wall that protrudes outside the wall. It is more recognizable in indoor climbing, but it is part of all climbing walls. Even though it isn’t technically a handhold, it still makes this list because it is one of the most commonly found things in climbing that you use your hand to leverage.
Rock Climbing Grip Technique for Climbing Volume Holds
Using a climbing volume is completely dependent on the problem and sometimes it is more of an obstacle than something that you hold. If you can hold it, however, then use it like an edge. Put as many fingers on the volume as you can and put your weight in the opposite direction of the angle of the hold so that you are pulling on it.
Another use for climbing volumes and maybe a more popular use of a volume is to push on it with your foot to push your center of gravity closer to your next climbing hold. In regards to using your feet on volumes, they can sometimes be used for a toe hook or heel hook or even to stand on if they are positioned conveniently.
14. Foothold Climbing Holds
Foothold climbing holds are small blocks that aren’t big enough to use for your hands but have enough surface to step on with your toe or the edge of your foot. Sometimes climbers will use footholds as small finger holds to help with balance, but they are specific for your feet.
Rock Climbing Grip Technique for Climbing Footholds
The technique for climbing footholds is to place the tip of your toe on top of the hold. If you are having a hard time “gripping” the foothold with your toe, a simple trick is to place the toe against the wall as much as possible and then push your weight down into the hold. A frequent challenge that beginner climbers have is that they don’t push enough/put enough weight on the climbing hold causing them to slip off.
Conclusion
There are many types of climbing holds and they vary in different crevices or shape, but these are the most common shapes/types for indoor and outdoor climbing. Bouldering holds and rock climbing holds are the same in regards to climbing terminology. However, bouldering is usually more difficult to use and require a more refined technique.
It is a good idea to evaluate your current strengths and weaknesses to identify what type of holds you struggle with and practice climbs that require those types of holds. Here is a Climbing Hold Proficiency Test that you are welcome to use. The techniques that I’ve suggested to use the climbing holds above aren’t the only way and there may be a technique that suits you better, however, if you haven’t tried the way I recommended, it is worth a try. See what works best for you and if there is another way you suggest, let me know – I’ll try it, and if I like it I will add it to this list.
More About Training for Climbing:
- How To Climb More Often Without Getting Injured | Tried And Tested Methods For Recovery
- Lower Body Mobility And Flexibility Challenge
- Neglected Techniques Necessary For V4-V5 Progression
- 17 Footwork Drills For Climbing
- Mental Training For Climbing
- How Often And Hard Should You Climb To Get Gains?
- When Should You Start Hangboarding For Boulder’s
- Is Bouldering When Sore Bad?
- The Top 22 Climbing Techniques And Skills And How To Do Them
- 23 Tips For Climbing Slabs
- When To Flag In Climbing And How-To-Do It (With Videos)
- How To Learn Climbing Technique For Beginners
- What Should You Record In A Climbing Journal?
- Climbing Endurance: Muscle, Skin And Mental Training
- How To Deal With Fear Of Falling
- How Many Days Should You Climb Per Week?
- 5-10 Minute Warm-Up For Climbing
- What Is A Dyno And How To Do It
- What Is A Gaston In Climbing? Powerful Moves For Beginners
- Can Foam Rolling Improve Rock Climbing Performance?
- 7 Things Climbers Should Do On Rest Days For Better Performance
- When Do You Need A Rest Day?
- How To Climb Your Best – Pros And Cons Of Rest Days
- Static Vs Dynamic Climbing Movement: Pros And Cons
- 5 Habits For Healthy Climbing That You Haven’t Thought Of
- 5 Things To Improve Climbing Performance And Sustainability
- 10 Minute Workout Routines For Post Climbing Sessions
- How To Use Climbing Holds: Techniques For Improved Climbing
- A Guide For Climbers: Bouldering Drills 101
- 12 Easy Workouts To Increase Hand And Grip Strength For Climbers
- What Are Undercling Climbing Holds And Why Climbers Love/Hate Them
- What Is A Crimp In Rock Climbing And How To Train For Them
- 7 Common Mistakes in Rock Climbing For Beginners

