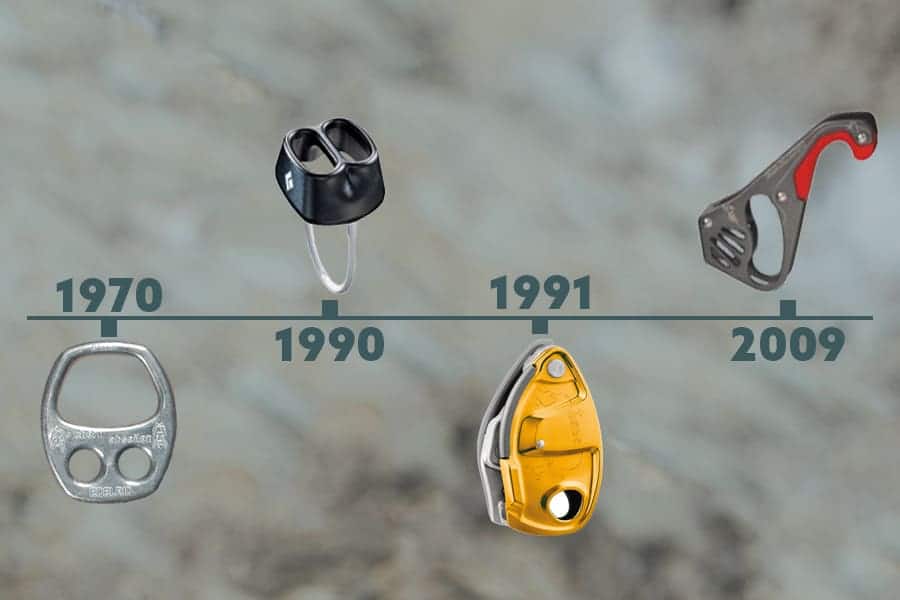
Before belay devices, people would just tie a rope around their waist while climbing. Eventually harnesses and different rods were used and to add additional safety to climbers but it wasn’t till the belay device that we saw a dramatic change in climbers safety.
What is a climbing belay device? A climbing belay device is a tool used by climbers to control the rope holding a climber in case the climber falls and/or when the climber needs to be lowered. There are three main types of belay devices, the tubular ATC, the auto-locking belay device and the semi-assisted belay devices.
The history of belay devices really came into focus in the 1970s, almost an entire century after climbing was considered a sport (1880’s in England). Since then, the development of belay devices has continued to evolve.
The first belay device
The first belay device patented in 1970 was called a Sticht Plate. Named after Fritz Sticht, the device was a metal plate with a slot for a bite of rope and a metal hook to create space between the harness and the device so it is easier to control the rope going through the device.
According to the patent, the device was made with aluminum or aluminum alloy and the aperture walls (the hole in the plate) was the width of two ropes with rounded edges to ease the rope running through it.
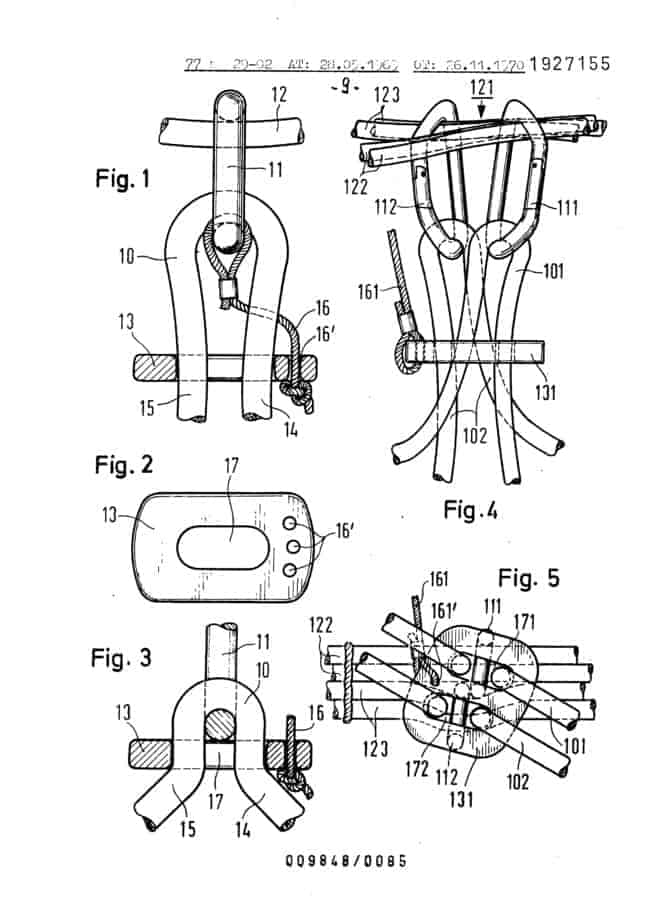
The brake is for a climbers rope which passes twice through a safety hook. An aperture (17) is located in a plate (13), and its internal longitudinal measurement is the equivalent of the sum of the double rope diameter and the diameter of the hook (11). The aperture walls are rounded off, the plate being formed of aluminium or aluminium alloy. It has an additional bore, and a string (16) passing through it fastens the plate to the hook or to a climbers belt. The plate may have two staggered parallel apertures for use with two ropes.
Patent Abstract
Later renditions of this device had two holes and a metal spring to better help with the movement of the rope through the device.
The general idea of this device picked up momentum and many companies started creating their own devices that functioned similarly to the Stitcht.
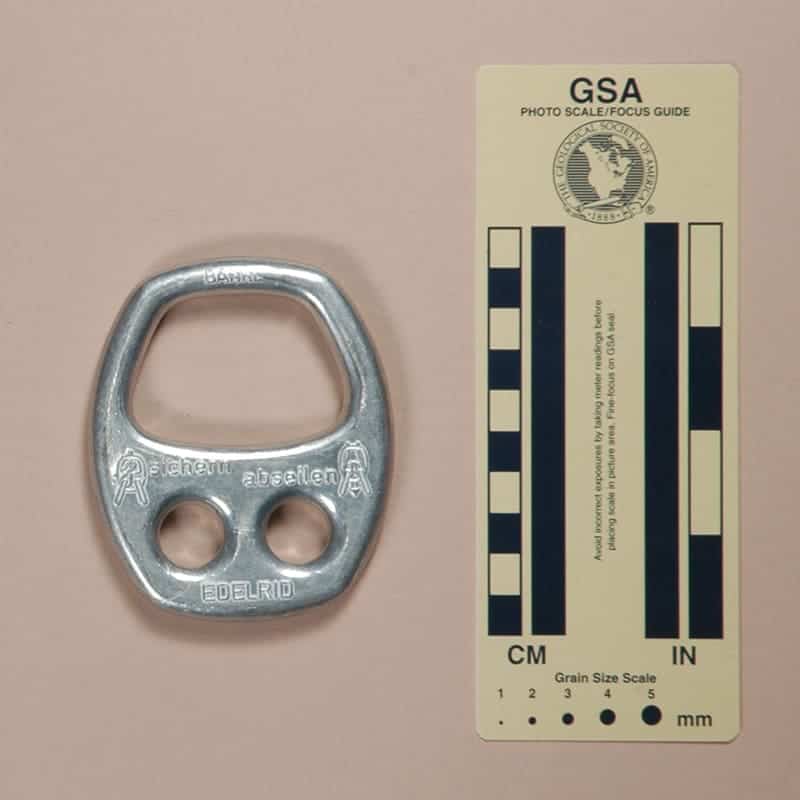
For example, this is an Edelrid Bankl from the 70s has a large hole for the rope (37mm wide) and two smaller holes for a rope or carabiner to go through it.
How belay devices have changed over the years
In the 70s more and more devices that had a wider base started to be developed. Some devices thickened the space where the rope would go through and some created metal bars that would better separate the device from the climbers’ harness/belt and some created a more tube-like device.
Eventually, designs branched off from each other and there was a separation between Slotted Block devices and a tubular device, which is similar to the basic ATCs we have today.
Figure 8
The slotted block devices maintained a more flat profile and eventually the figure 8 came about. The Figure 8 was unique and revolutionary because it created a smooth surface for the rope to move through and it was easy to use.
However, the biggest problem that they presented was that they twisted the rope and there wasn’t an easy way to lock off the device.
Figure 8s are still sold and used by many climbers. I have two figure eights and used to use them to repel.
Though you can purchase them relatively cheap (mine were $8), they are considered less safe and most climbing gyms around the world don’t allow them.
How do Figure 8 Belay devices work
Figure 8 devices work by creating a separation between you and the rope while also allowing the user to have better control over how much rope goes through the device.
Figure 8 belay devices are relatively easy to use:
- You take a bite of the rope through the large hole
- Place the bite of the rope around the smaller circle of the device
- Hook the carabiner through the smaller circle and the belay loop on your harness.
To lower yourself/repel, all you have to do is feed the rope with your break hand through the big hole. When you want to stop, hold your break hand tight and by your side so that the friction in the Figure 8 can stop feeding the rope through it.
Tubular ATCs
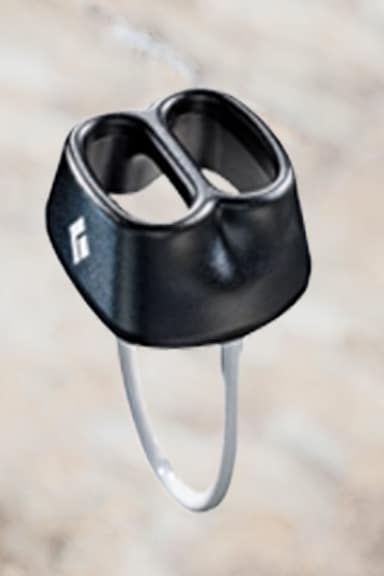
While some companies focused on creating what has become known as the figure 8, other companies started focusing on the tubular devices.
The idea of a tubular device was that you could create more surface for the rope to run through and thus have more control over the rope.
How do ATCs work
The function of an ATC works to control the speed that a rope by creating friction and an edge that a climber can leverage to make stopping the rope easier.
A bite of the rope (a folded piece of the rope) is threaded through the device and attached to a belay loop on a climbing harness using a carabiner.
One end of the rope is attached to the climber and the other end of the rope is controlled by the belayer’s brake hand.
When the belayer places their end of the rope below the ridge of the belay device, the device creates friction on the rope and prevents it from moving through the device. Even if the climber is heavier than the belayer, the device will still stop the rope from moving through it.
To set-up an ATC belay device, it is very simple:
- Take a bite of the rope (fold the rope) and place the folded end of the rope through one metal hole in the belay device.
- Using a carabiner, attach the belay device (by the metal band) and the loop of rope to the harness’s belay loop.
To move rope through the device, move the rope from the brake-hand up toward the belay device. As long as the climber’s weight is on the other end of the rope, they will lower.
Tubular ATC’s with Teeth
Since the basic tubular device, there have also been creations of ATCs that have ridged edges on the side of the ATC that has the rope slack controlled by the brake hand. The extra ridges add additional friction and make it even easier to control the speed of the rope and decrease the effort of the belayer.
Evolution of auto-locking devices
When a climber fell and the rope picked up speed through the device, in a basic ATC, all of the pressure of catching the climber would be on the belayer to move their brake hand into the brake position.
If the belayer didn’t do this or was impaired by a falling rock or something like that, then the climber would fall to the ground. Often resulting in major injuries or even death.
The Grigri by Petzl was released in 1991 and changed that. For an extra $100 a climber could purchase the Grigri and have an assistant to prevent climbers from falling even if the belayer became impaired.
How The Grigri Works
When a climber falls, the weight of the climber would cause the camming system to move into a pinch position and prevent the rope from moving through the device, thus preventing the climber from falling.
To lower the climber, the cam would be manually moved into a neutral position and thus release the rope and allow the climber to be lowered in a controlled manner.
The Evolution of A Grigri
Similar to how the Grigri functions today, the first rendition had a cam that would pinch the rope to prevent it from moving by moving its position. However, the Grigri didn’t have a comfortable or easy way to lower the climber once the cam was engaged.
To fix this problem, newer renditions of the Grigri had a lever that could be utilized to move the device back into a neutral position and prevent the cam from pinching the rope.
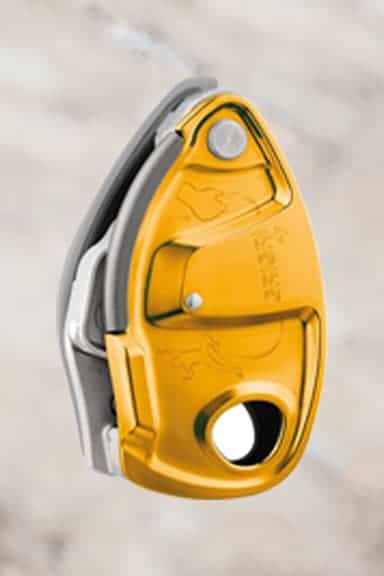
With the first lever-controlled Grigri, however, some belayers would panic and instead of releasing the lever and allowing the device to re-pinch the rope, they would hold down the lever and the climber would have an uncontrolled fall to the ground.
With the Grigri+, Petzl created an anti-panic mode that made it so when a climber moves the brake lever back too far, like how they would when they were panicked, the device auto-reengages the cam and pinches the rope.
Other Auto-Locking Belay Devices
The camming device of the Grigri was so new (and patented) that it took companies a long time before they started making their own version that would do essentially the same thing.
To create separation between their product and the Grigri, competitors’ looked at how easy it is to use, how comfortable the device was, how heavy it was and any common complaint around the device in general so that they could do something better.
However, it took two decades before a reputable competitor’s product got on the market and by that time, the Grigri had become so popular, that it will likely be another decade before any company is as recognizable for their auto-locking devices as Petzl is with the Grigri.
Popular Auto-Locking Devices:
- Tango Vergo was released in 2014
- Camp Matik was release in 2015
- Madrock Lifeguard was released in 2017
- Wild Country Revo was released in 2018
Evolution of the Wild Country Revo
See the price from backcountry here and REI here.
The Revo is relatively new and was released in 2018, which is 27 years after the first Grigri was released.
This evolution of the Wild Country Revo is notable because it may be an indication of where future auto-locking belay devices are headed.
Most of the auto-locking devices use a similar camming-pinch-system that the Grigri does, but the Revo by Wild Country is one of the auto-locking devices that has a different camming system.
How the Revo Works
The way the Revo works is that it has a circular camming system in the center of the device. The camming system is only able to move up to four meters per second, so when it does reach that speed, the camming system engages, locking the rope into place.
To unlock the rope, the belayer engages the brake hand and pulls the brake rope down until the Revo clicks and lowers the safety arm of the device.
The Difference Between the Revo and the Grigri
As mentioned above, most auto-locking devices are built just like the Grigri with subtle differences. The Revo, on the other hand, was made to be a backup system and thus has different features and functionalities.
- The idea of the Revo is that it only locks if an error occurs. For example, if a climber falls and the belayer fails to put the brake hand into the proper position, then it would engage a cam on both sides of the device. This is a little different from the Grigri because even if you have your brake hand in the correct position, the weight of a climber falling forces the Grigri cam to pinch the rope.
- The Revo functions the same way an ATC does when it comes to giving slack and taking slack. This is different than the Grigri because, with the Grigri, you have to hold the cam open while feeding the rope through it. The Revo only pinches the rope if the brake hand/rope isn’t being pulled into a break position
- The Revo can be used in any orientation and with both your left and right hand. This is different than the Grigri because the Grigri doesn’t function if you flip the orientation of the rope. In addition, the Grigri is only functional with right-handed belaying.
Evolution of semi-assisted braking devices
To provide additional support for belayers than that of an ATC but with a smaller price tag of the auto-locking devices, the semi-assisted braking devices were created.
The device doesn’t have an automatic locking-cam like the auto-locking device, nor is there a lever-like device to release the pinched rope. However, semi-assisted braking belay devices do pinch the rope and prevent it from going through the device if the climber falls, even if the belayer is impaired.
Popular semi-assisted belay devices:
- Mammut Smart was originally released in 2009
- Edelrid Jul was originally released in 2014
- Black Diamond Pilot was released in 2017
- Climbing Technology Click-Up was released in 2018
How Semi-Assisted Braking Devices Work
If the belayer was impaired or slow to respond to a climbers fall, the semi-automatic belay device moved into a position that pinched the rope between the belay device and the carabiner to prevent the rope from moving through it.
To lower the climber the belayer can re-adjust the position of the belay device and control the speed of the rope going through the device by controlling the angle that the belay device is at.
The Mammut Smart was one of the first widely known semi-assisted braking devices on the market. For years, climbers that wanted the additional assistance from a belay device would purchase the Mammut Smart for a cost that was usually more than double or even triple the basic ATC device, but still half the price of the Grigri.
The Future of Belay Devices
In many climbing gyms around the world, tubular ATCs aren’t allowed and auto-locking devices are becoming more popular.
In addition, many climbers have expressed that they aren’t comfortable climbing unless their belayer is using an auto-locking device.
This is an indication that the world of belay devices will likely become more auto-locking oriented with semi-assisted devices trailing behind. The day that happens however, isn’t likely to be too soon.
There are the older climbers (frequently referred to as the “original climbers”) that express their dislike for using auto-locking belayers. However, I imagine with continued development of auto-locking devices, they will become even more common than the basic ATC, despite the extra cost it takes to make the devices.
Climbing companies around the world are still developing belay devices and constantly improving them. There is no doubt that they will continue to become better and better over the years.
More Buyer’s Guides:
- The Top 5 Crash Pads For Bouldering: How To Decide Which Is Best
- Diy Hangboard With Jugs And Edges For Less Than $15
- 6 Of The Best Belay Devices For Beginner Climbers
- The Best 11 Climbing Shoes Under $100
- Climbing Chalk: Chunky Vs. Fine
- The Best Chalk For Climbing And Bouldering
- Rock Climbing Starter Kits For Beginners Compared
- Liquid Chalk Vs. Dry Chalk For Bouldering (Hint: Dry Chalk Is Better)
- Top 5 Gear You Need In Your Climbing Pack For The Best Experience
- What To Wear While Bouldering
- Should You Upgrade To An Assisted-Braking Belay Device?
- Everything You Need To Know About Climbing Chalk
- 37 Things Serious Climbers Bring With Them To The Mountains
- Clothing For Climbing In The Gym – What Should You Wear?
- Can You Climb Without Chalk?
- How Tight Climbing Shoes Should Fit For The Best Performance
- Harnesses For Rappeling
- My Favorite Harness For Climbing
- What You Should Wear While Climbing
- What Affects How Climbing Shoes Fit?
- How To Clean Your Grigri
- How To Care For Your Climbing Rope
More Trending Topics Like This:
- What Happened During The Men’s 2021 Climbing Olympics?
- Who Are The Climbers Competing In The Tokyo Olympics 2021?
- Is Climbing A Sport?
- How Many Calories Do You Burn From Climbing?
- 17 Reasons Why Bouldering Is So Popular
- The Evolution Of Climbing Belay Devices
- 23 Storage Ideas For Your Climbing Gear
- Why Is Climbing Such A Mental Sport?
- The Best Way To Take Climbing Chalk Through Airport Security
- Is Bouldering That Hard? Yea, It’s Hard – This Is Why
- Is Climbing Considered A Sport
- Is Climbing And Bouldering Good For Cardio?
- Top 10 Home Climbing Gym Designs
- 9 Signs You’re Seriously Addicted To Climbing
- Why Do People Like Climbing?
- What You Need To Know About Climbing In The 2021 Tokyo Olympics
- Can Climbing Build Abs And Make You Look Chiseled
- How To Introduce Your Friends To Climbing (15 Steps)
- Tips For Handling Your Period While Climbing
- Is Bouldering Outdoors Harder Than Indoors?
- Can You Go Rock Climbing Outdoors During The Covid 19 Pandemic?
- 7 Reasons To Wear Socks With Climbing Shoes
- What Is Dabbing? | Climbing Vocabulary And Culture
- Bouldering Vs Climbing: Training, Skills, Strength, Grades
- Indoor Vs Outdoor Climbing: A Thorough Comparision
- 22 Health Benefits Of Climbing – Backed By Research
- Bouldering And Sports Climbing Glossary: Lingo And Language
- Quick Tips For Getting Back Into Climbing After A Long Break
- 10 Legit Reasons You Should Not Rock Climb
- Can Climbing Build Muscle And Replace Weight Training?
- Do You Wear Socks With Rock Climbing Shoes?
- Is Bouldering Dangerous?
- What Should You Record In A Climbing Journal?
- How Are Climbing Routes Graded?
- First Time At The Bouldering Gym – What You Should Know
- 7 Common Mistakes In Rock Climbing For Beginners
- How Do Alpinists Get Down?

